Blog Entry
Starting Atmel AVR C Programming Tutorial 2
November 14, 2008 by rwb, under Microcontroller.
In our previous tutorial you have learned how to create project and compile the C code on Atmel AVR Studio. In this tutorial we will show you the next two step to complete the basic development cycle of using C programming language for the Atmel AVR microcontrollers.
4. The Bugs Life
Many years ago in the first computer history; debugging it’s mean literally finding a bugs, when all the computer’s engineers have to find this little animal among hundred of cables and tubes to fix the electronic problems. Today debugging is an essential aspect in any type of programming languages. Atmel AVR Studio have build in sophisticated simulator that let you execute your C code one line at a time and seeing the result on the CPU registers and memory.
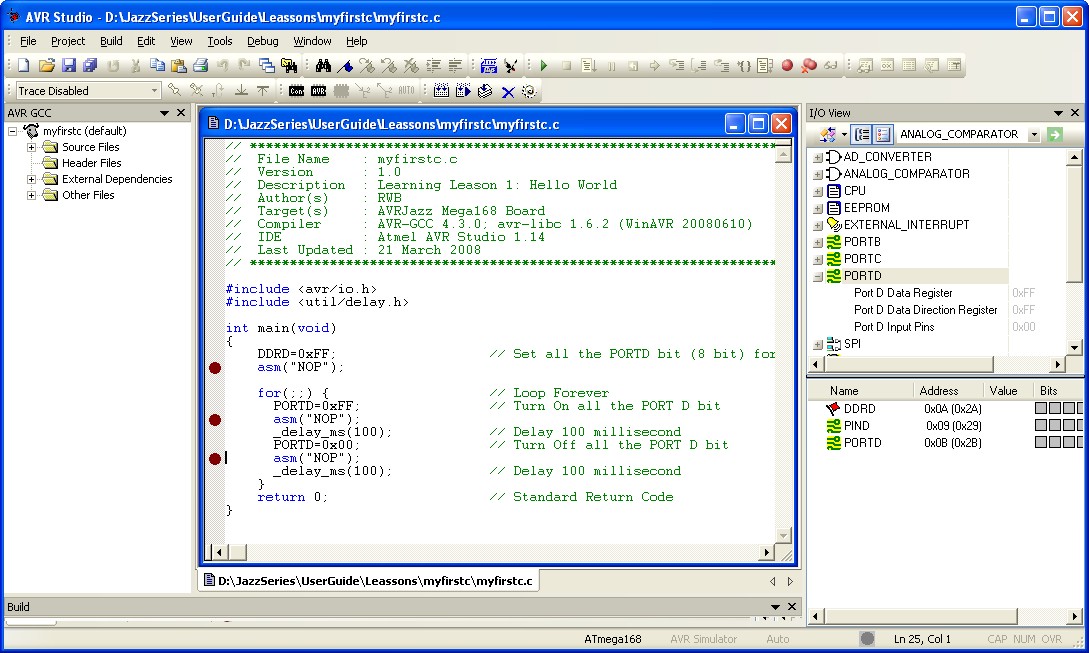
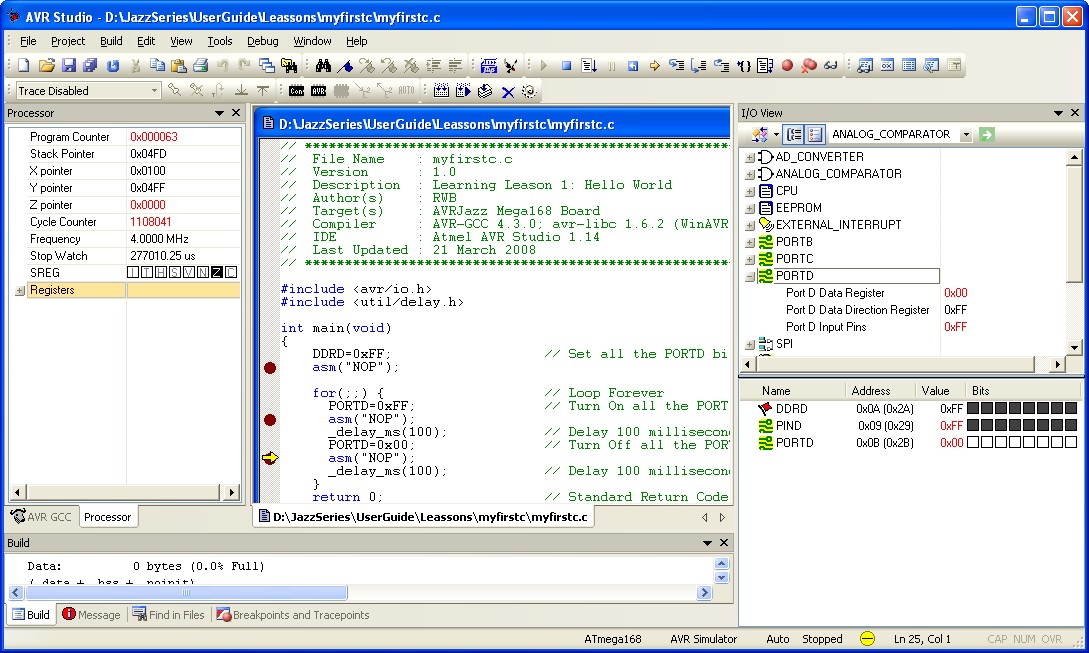
To make debugging process easier to watch; in this example we will add the break point statement asm(“NOP”) which is simple no operation instruction to the AVR microcontroller and place the break point on each statement by placing the cursor on the asm(“NOP”) statement and press F9 or from menu Debug -> Toggle Break Point (the red dot sign) as shown in this following program and picture:
/***************************************************************************
//  File Name    : myfirstc.c
//  Version      : 1.0
//  Description  : Learning Lessons 1: Hello World
//  Author       : RWB
//  Target       : AVRJazz Mega168 Board
//  Compiler     : AVR-GCC 4.3.0; avr-libc 1.6.2 (WinAVR 20080610)
//  IDE          : Atmel AVR Studio 4.14
//  Programmer   : AVRJazz Mega168 STK500 v2.0 Bootloader
//               : AVR Visual Studio 4.17, STK500 programmer
//  Last Updated : 21 March 2008
//***************************************************************************
#include <avr/io.h>
#include <util/delay.h>
int main(void)
{
    DDRD=0xFF;                   // Set all the PORTD bit (8 bit) for Output
    asm("NOP");
    for(;;) {                    // Loop Forever
      PORTD=0xFF;                // Turn On all the PORT D bit
      asm("NOP");
      _delay_ms(100);            // Delay 100 millisecond
      PORTD=0x00;                // Turn Off all the PORT D bit
      asm("NOP");
      _delay_ms(100);            // Delay 100 millisecond
    }
    return 0;                    // Standard Return Code
}
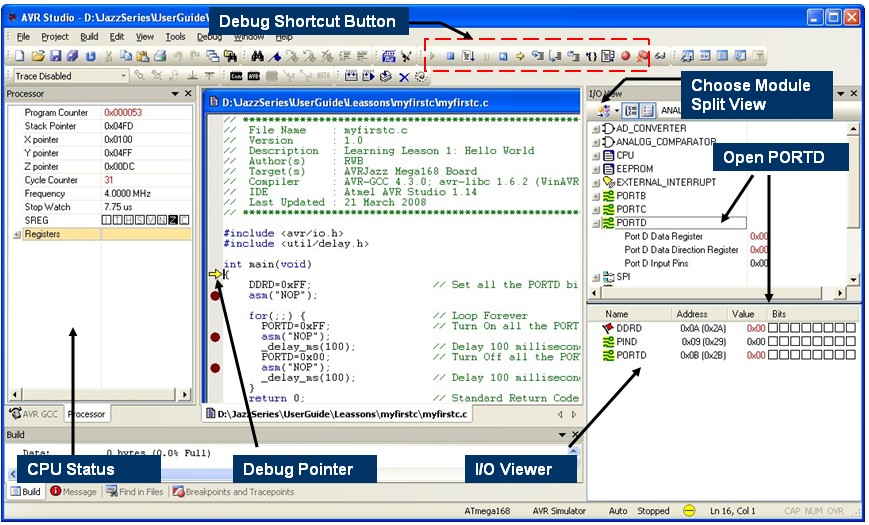
Rebuild your program from menu Build -> Rebuild All and then start the debugger, select the menu Debug -> Start Debugging as shown on this following picture:
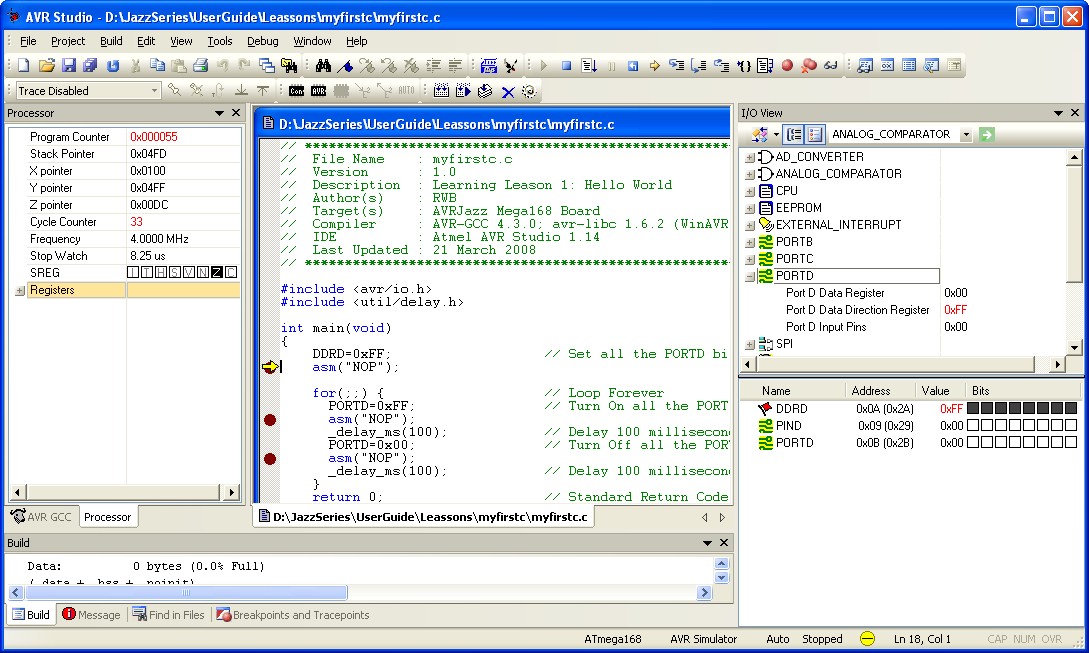
Press Ctrl+F10 or from menu Debug -> Run to Cursor, the yellow debug pointer will execute the DDRD=0xFF statement. This will change the DDRD register to 0xFF on the I/O View windows as shown on this following picture:
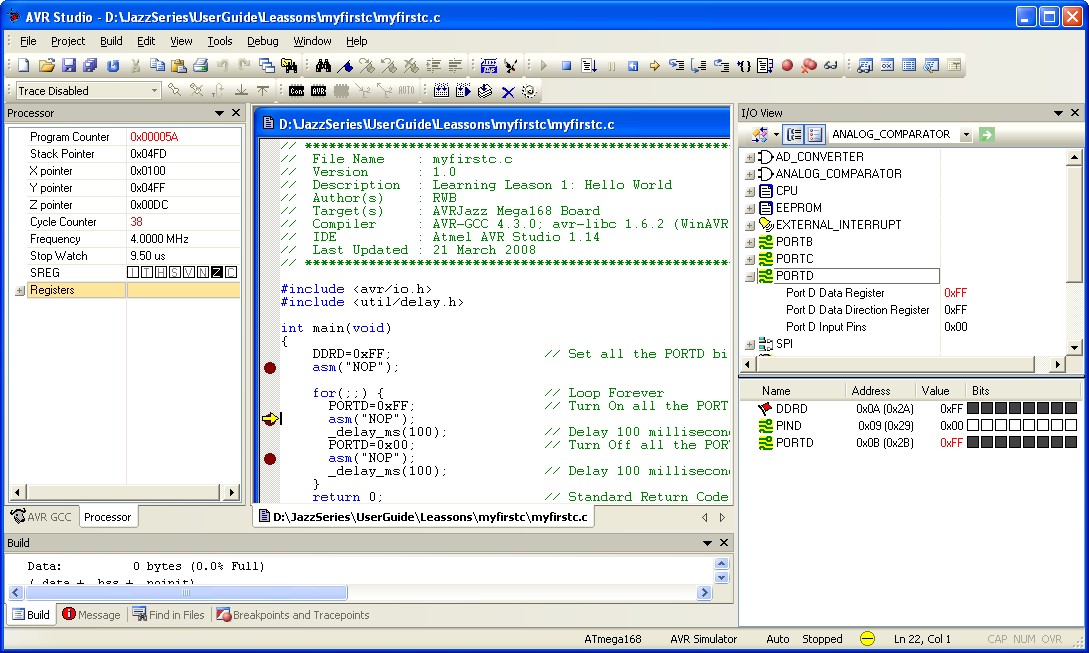
Continue press Ctrl+F10 or from menu Debug -> Run to Cursor, the yellow debug pointer will execute the PORTD=0xFF statement. This will change the PORTD register to 0xFF on the I/O View windows as shown on this following picture:
Now the debug pointer point to the asm(“NOP”), because there is _delay_ms(100) function and we don’t want to debug inside this function, so we press Ctrl+F10 or from menu Debug -> Run to Cursor. The debugger will execute PORTD=0x00 and _delay_ms(100) function and stop on our break point as shown in this following picture:
After executing the PORTD=0x00, the PORTD register is set to 0x00. You could continue watching the process; so you will become more familiar with this essential tools.
5. Download the Code into the AVR
Up until to this point there is no hardware involve, all the compiling and simulating is running on the Atmel AVR Studio software. Now it’s time to show the world how good you are in this AVR Microcontroller gizmos, we are about to put the real code inside this thing.
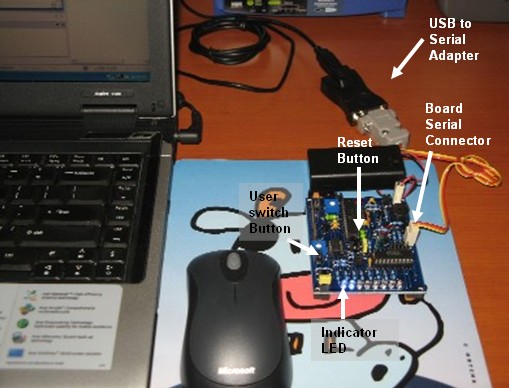
Preparing the AVRJazz Mega168 Board into the programming mode by pressing the User Switch Button together with the Reset Button, two indicator LED will lid and the board is ready for accepting command through the RS232 port (If you don’t have RS232 port on your PC, you could use the USB to RS232 adapter). and connect it to your PC as shown on this following picture:
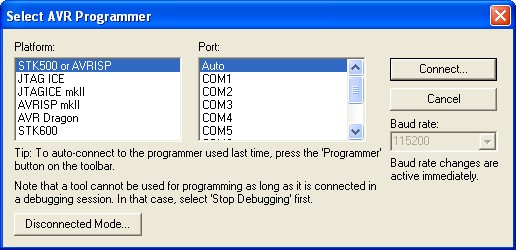
To download the HEX file to the AVRJazz Mega168 board, from menu Tools -> Program AVR -> Connect… this will open the AVR programmer selection as follow:
Select the STK500 or AVRISP platform and Auto for the port then click the Connect button.
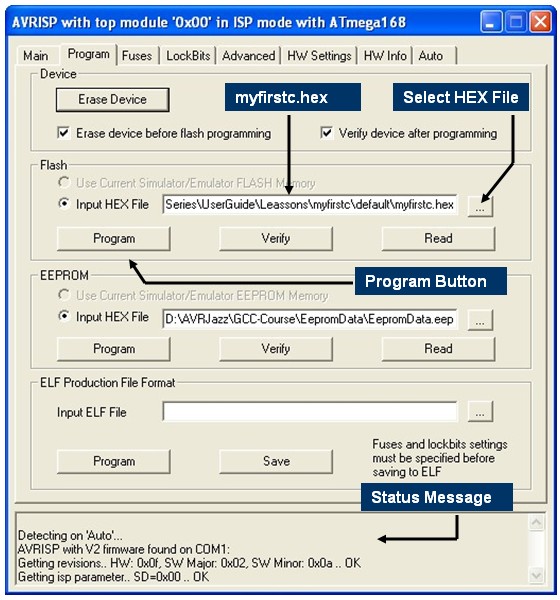
After selecting myfirstc.hex file (is in YOUR_PROJECT_DIRECTORY\default directory) for the HEX File then click the Program button; now the programmer will start download the HEX code into the Microcontroller; the status message will show the following message:
Getting isp parameter.. SD=0×00 .. OKOK
Reading FLASH input file.. OK
Setting mode and device parameters.. OK!
Entering programming mode.. OK!
Erasing device.. OK!
Programming FLASH .. OK!
Reading FLASH .. OK!
FLASH contents is equal to file.. OK
Leaving programming mode.. OK!
Close the AVR programmer program and press the reset button on the AVRJazz Mega168 Board and let the program running which is simply flashing all the eight blue LED on the board.
Bookmarks and Share


Related Posts
2 Responses to “Starting Atmel AVR C Programming Tutorial 2”
Comment by rwb.
You could read this project on my posted blog “Atmel AVR ISP Microcontroller Programmer Project” (http://www.ermicro.com/blog/?p=277). Although is not using the USB directly, but you could use many of the USB to COM/RS232 adapter available on the market or you could replace the RS232 schematic part with FT232R (USB to UART interface) chip from FTDI. The firmware will work well for both approach although the first one will easier and cheaper. I plan to post more detail about the FT232R chip on this blog in the near future.

Comment by shakil041055.
Thank for ur help by ur website, would you help me
by giving AVR USB programmer circuit and software and driver and procedure.