Blog Entry
Starting Atmel AVR C Programming Tutorial 1
November 13, 2008 by rwb, under Microcontroller.
In this two series of tutorial, we will provides you with the information on the tools and the basic steps that are involved in using the C programming language for the Atmel AVR microcontrollers. It is intended for people who are new to this type of microcontrollers. The AVRJazz Mega168 board will be use in this tutorial, however this information could be applied to other AVR family as well.
1. Which tools should I use
To start C programming language on Atmel AVR Microcontroller you need to download these following tools:
- Down load the latest Atmel AVR Studio which provide you with the complete IDE (integrated development environment) for managing project, program editing, compiling, debugging and downloader for all Atmel AVR Microcontroller series.
- The Atmel AVR Studio only provide you with native microcontroller language (assembler), so you need to down load the WinAVR Project which provide you with AVR GCC (GNU C Compiler for AVR Microcontroller) base compiler and library for window environment. This AVR GCC is fully integrated and supported by Atmel AVR Studio.
After downloading, first install the Atmel AVR Studio and just follow all the default setting and secondly install the WinAVR, again follow the default setting.
2. My first AVR Project
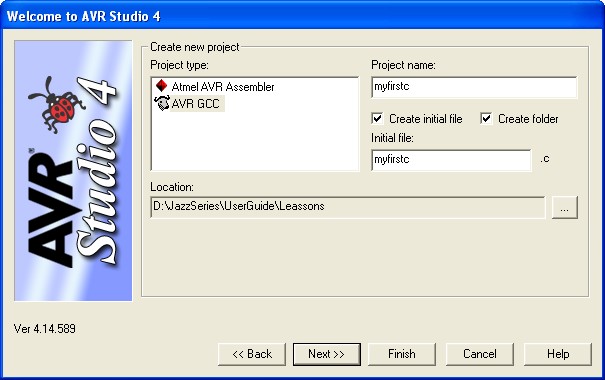
To create your first AVR project go to Start -> All Programs -> Atmel AVR Tools -> AVR Studio 4, this will launch the AVR Studio 4 application and the Welcome to AVR Studio 4 form appear, click on the New Project button and it will show the Create new project screen as follow:
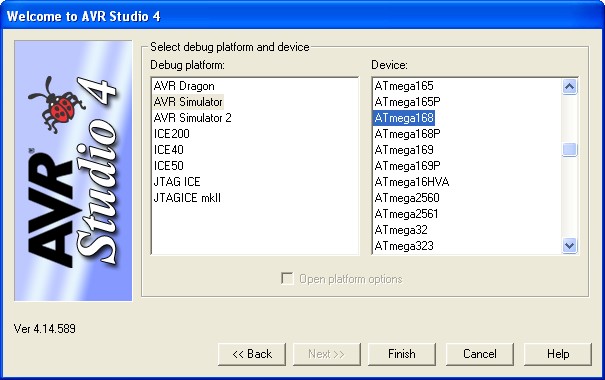
On Project Type choose AVR GCC, enter myfirstc for the project name and you could also change the project location directory as you like, then click on the Next>> button, you will be asked for debugging platform on the following screen:
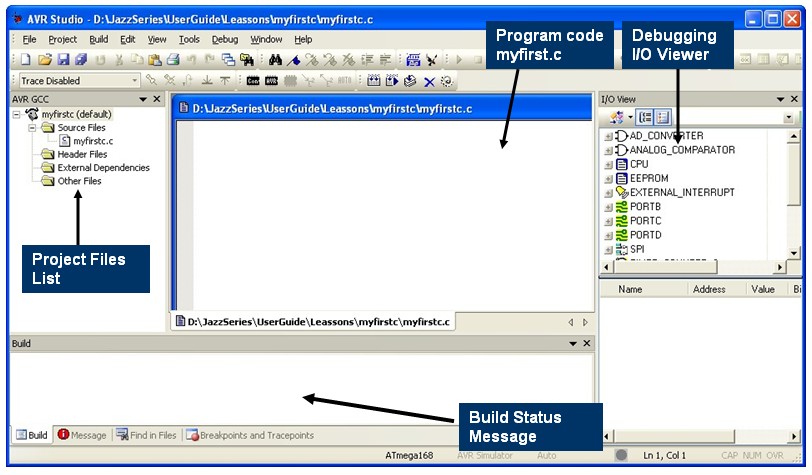
Choose AVR Simulator for debug platform and ATmega168 for the device, then click on the Finish button. This will create all the necessary files and directories needed for this project. Now the AVR Studio 4 IDE is ready and display the empty myfirstc.c file.
Enter or cut and paste this source program bellow to the program code windows:
/***************************************************************************
//  File Name    : myfirstc.c
//  Version      : 1.0
//  Description  : Learning Lessons 1: Hello World
//  Author(s)    : RWB
//  Target(s)    : AVRJazz Mega168 Board
//  Compiler     : AVR-GCC 4.3.0; avr-libc 1.6.2 (WinAVR 20080610)
//  IDE          : Atmel AVR Studio 4.14
//  Last Updated : 21 March 2008
//***************************************************************************
#include <avr/io.h>
#include <util/delay.h>
int main(void)
{
    DDRD=0xFF;                   // Set all the PORTD bit (8 bit) for Output
    for(;;) {                    // Loop Forever
      PORTD=0xFF;                // Turn On all the PORT D bit
      _delay_ms(100);            // Delay 100 millisecond
      PORTD=0x00;                // Turn Off all the PORT D bit
      _delay_ms(100);            // Delay 100 millisecond
    }
    return 0;                    // Standard Return Code
}
The program start with the standard comment (all the statement start with double slash is consider as comment in standard C syntax) that give the information about the program, version and compiler version, etc. The next two include statement tell the C compiler to include the AVR microcontroller specific library <avr/io.h> and the delay library <util/delay.h> when compiling the program.
Inside the main program, first we instruct the AVR microcontroller (i.e. Mega168) to enable it’s 8 bit PORT-D input/output port for output by setting the data direction register (DDRD) on PORT-D to 0xFF.
Next inside the blank for loops statement (it’s mean we loop continuously) we simple instruct the AVR microcontroller to turn on and off all it’s 8 bit PORT-D by assigning the value 0xFF (on) and 0x00 (off) to the PORT-D register (PORTD). The 100 millisecond delay is put there so our eye could catch the process, otherwise the process is so fast that we see the port is always on.
3. Building the HEX Files
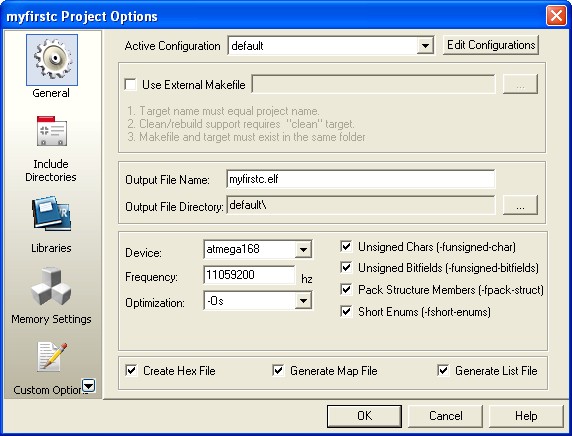
Before compiling and building the HEX files we have to tell the AVR Studio about our board device, by clicking the menu Project -> Configuration Options the Configuration options form will appear as the following picture:
Make sure the device selected is atmega168 and the frequency is set to 11059200 hz (this is the AVRJazz Mega168 board default frequency). Leave the other setting to it’s default then click the Ok button.
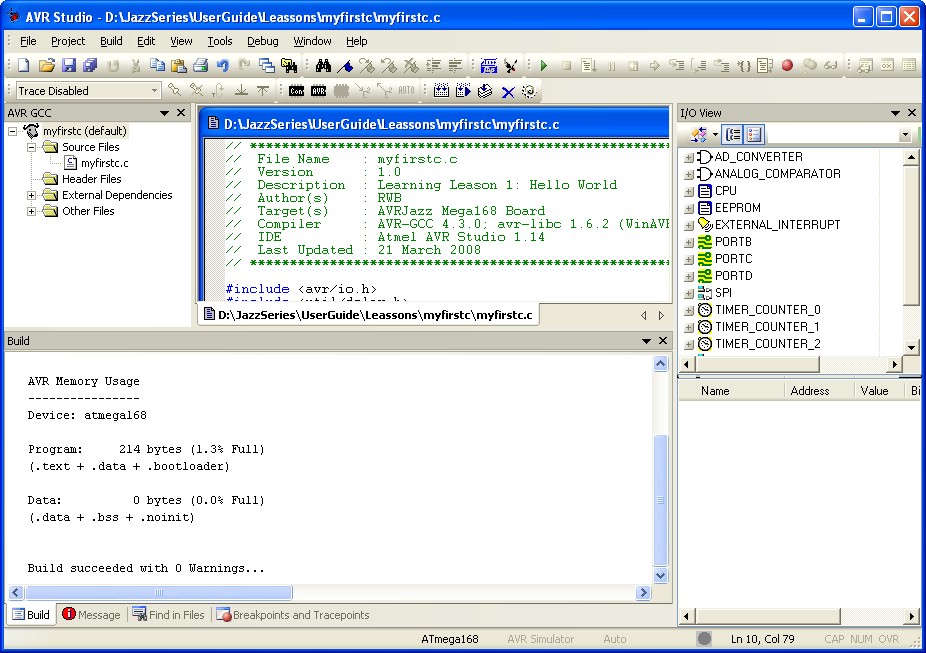
The next step is to building the program by clicking the menu Build -> Rebuild All, if there is no error the myfirstc.hex file will be produced and the status message will show Build succeeded with 0 Warning:
If there are error messages, check and recheck again your C code. Most often, they are caused by some typos or syntax errors. In our next tutorial we will show you how to debug the code and download it to the AVRJazz Mega168 Board.
Bookmarks and Share


