Blog Entry
Using Serial Peripheral Interface (SPI) with Microchip PIC18 Families Microcontroller
September 12, 2010 by rwb, under Microcontroller.
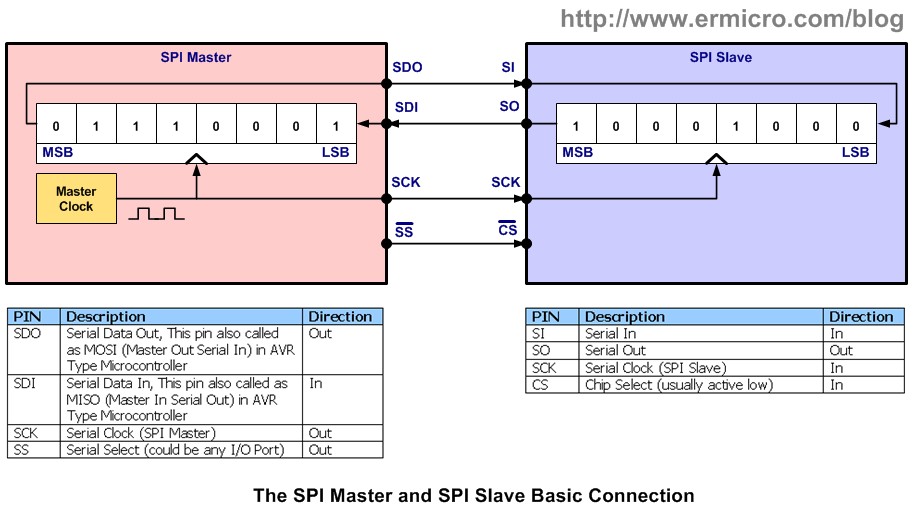
The Serial Peripheral Interface (SPI) is one of the popular embedded serial communications widely supported by many of today’s chip manufacture and it considered as one of the fastest serial data transfer interface for the embedded system. Because of its special in/out register configuration, the SPI master device could transfer its data and at the same time it receive a data from the SPI slave device with the clock speed as high as 10 MHz. Beside its superior data transfer speed; SPI also use a very simple data transfer protocol compared to the other serial data transfer methods. When the SPI master device want to send the data to the SPI slave device then the SPI master will just simply shifting its own data through a special 8-bits register and at the same time the SPI master will receive the data from the SPI slave into the same register as shown on this following picture:
With this circular shift register connection between the SPI master and the SPI slave devices, the complete data transfer from both devices will be accomplished in just 8 clock cycles. This means the SPI devices only need about 0.8 us to complete transfer the 8-bit data if we use 10 MHz clock. One of the drawbacks using the SPI especially when we use multiple SPI slave device is the SPI slave could not initiate sending its own data to the SPI master device, all the data transfer initiation is always come from the SPI master. The SPI master device has to poll each of the SPI slave devices to know whether the SPI slave device has a data to be sent to the SPI master device or not.
Polling the entire SPI slave devices will eventually consumed the SPI master resources when the SPI slave devices to be polled increase, therefore some of the SPI slave device is equipped with the interrupt pin to notify the SPI master device that it has a data to be read. You could read more about how SPI work in my previous posted blog Using Serial Peripheral Interface (SPI) Master and Slave with Atmel AVR Microcontroller.
The PIC18F14K22 Microcontroller
On this tutorial I will use the Microchip PIC18F14K22 microcontroller, this microcontroller is one of my favorite 8-bit 20-pins PIC18 microcontroller families members as it is equipped with sophisticated advanced peripheral inside such as ADC, USART, ECCP (Enhanced Capture/Compare/PWM), SPI, I2C and the SR Latch (555 Timer) module for capacitive sensing. With 16K bytes flash ram and equipped with the build in circuit debug, this 8-bit 20-pins microcontroller is a perfect choice for serious embedded application or just for hobbyist’s project.
The PIC18F14K22 microcontroller SPI peripheral support both master and slave mode but on this tutorial we will only exposing the PIC18F14K22 SPI master mode where on the first part we will expand the PIC18F14K22 microcontroller I/O by using the SPI I/O expansion chip and the second part we will turn the PIC18F14K22 microcontroller into a very useful SPI device testing tools that could be used to test and debug most of the SPI device chip available today. Both of these projects will give a good understanding and experience of how the PIC18F14K22 microcontroller SPI master peripheral works.
Now let’s list down all the necessary hardware and software needed to accomplished these projects:
- Resistors: 330 Ohm (8) and 10K (1)
- LEDS: 3 mm Blue LED (8) and 3 mm Red LED (1)
- One momentary push button
- One Breadboard and some breadboard’s jumper cables
- PICJazz 20-PIN learning board with Microchip PIC18F14K22 microcontroller from ermicro
- Microchip PICKit3 programmer (used in this project); you could also use the Microchip PICKit2 programmer.
- Microchip MPLAB IDE version 8.47 and Microchip C18 Compiler version 3.30
- Microchip Reference Document: PIC18F14K22 datasheet, MCP23S17 datasheet, and MCP42xxx datasheet
Microchip MCP23S17 SPI I/O Expander
The Microchip MCP23S17 SPI I/O expander will give you additional of 16 I/O ports where all the 2 x 8-bits general purpose I/O ports (GPIO) could be configure both as output or input. The MCP23S17 IODIRA and IODIRB I/O direction register is used to control the I/O direction for GPA and GPB respectively.
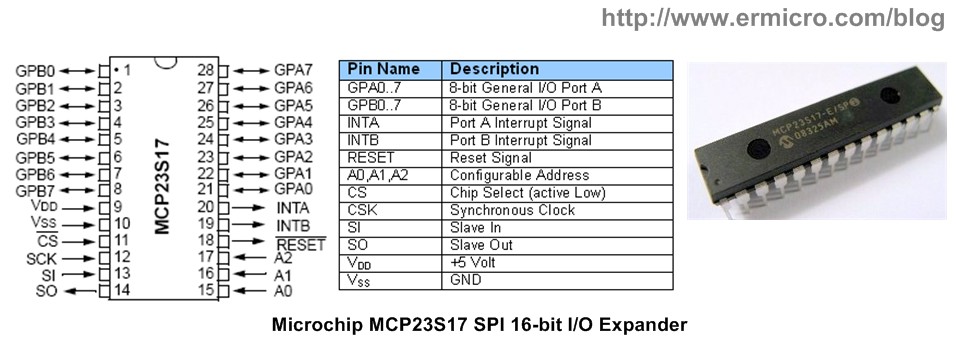
One of the unique features of the Microchip MCP23S17 SPI I/O expander is in its configurable address capabilities. By setting the needed address to its address pins A0, A1, and A2 we could configure up to 128 addressable SPI devices or in other world you could put up to 128 of MCP23S17 SPI I/O expander in the same SPI bus without having to have the separate CS (chip select) circuit logic for each of the MCP23S17 SPI I/O expander chip.
Each of the MCP23S17 general I/O pins also could be configured to generate interrupt when the ports pin changes its state (for more information please refers to Microchip MCP23S17 datasheet). For the purpose of this tutorial we will use the Microchip MCP23S17 just as the ordinary input and output expander for the PIC18F14K22 microcontroller.
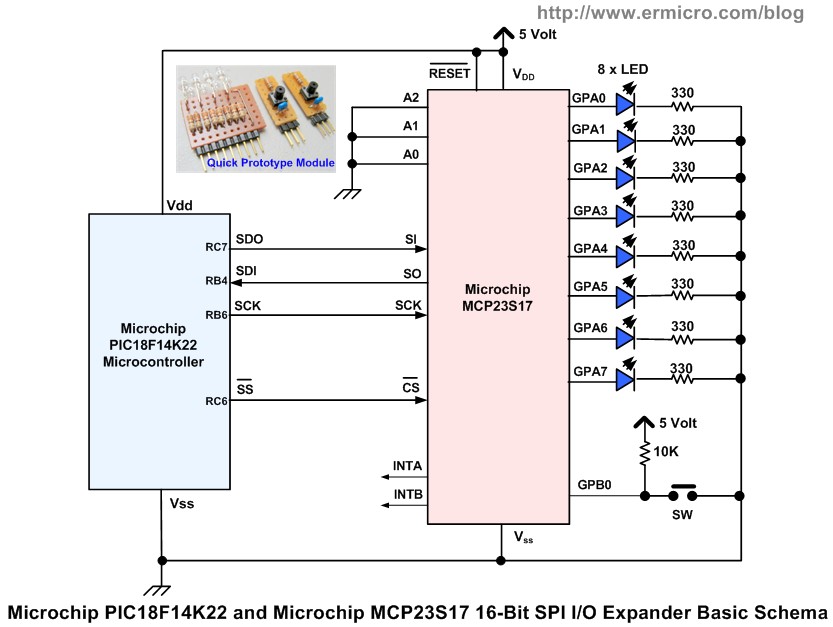
The MCP23S17 is configured to use address 0x00 (address pins A0,A1, and A2 are connected to the ground) and the push button switch connected to GPB0 port will be use as the toggle button to start and stop the chaser LED display attached to the GPA0 to GPA7 ports. The following is the C code to achieve these tasks.
/* ***************************************************************************
**  File Name    : picspi.c
**  Version      : 1.0
**  Description  : SPI I/O Using Microchip MCP23S17 16-Bit I/O Expander
**  Author       : RWB
**  Target       : PICJazz 20PIN Board: PIC18F14K22
**  Compiler     : Microchip C18 v3.36 C Compiler
**  IDE          : Microchip MPLAB IDE v8.46
**  Programmer   : PICKit3, Firmware Suite Version 01.25.20
**  Last Updated : 12 Aug 2010
** ***************************************************************************/
#include <p18cxxx.h>
#include <delays.h>
/*
** PIC18F14K22 Configuration Bit:
**
** FOSC = IRC        - Internal RC Oscillator
** PLLEN = OFF       - PLL is under software control
** PCLKEN = ON       - Primary Clock Enable
** FCMEN = OFF       - Fail-Safe Clock Monitor disabled
** PWRTEN = OFF      - Power Up Timer disabled
** BOREN = OFF       - Brown-out Reset disabled in hardware and software
** WDTEN = OFF       - WDT is controlled by SWDTEN bit of the WDTCON register
** MCLRE = ON        - MCLR pin enabled, RE3 input pin disabled
** LVP = OFF         - Single-Supply ICSP disabled
*/
#pragma config FOSC = IRC, PLLEN = OFF, PCLKEN = ON
#pragma config FCMEN = OFF, BOREN = OFF, PWRTEN = OFF
#pragma config WDTEN = OFF, MCLRE = ON, LVP = OFF
// MCP23S17 SPI Slave Device
#define SPI_SLAVE_ID    0x40
#define SPI_SLAVE_ADDR  0x00      // A2=0,A1=0,A0=0
#define SPI_SLAVE_WRITE 0x00
#define SPI_SLAVE_READ  0x01
// MCP23S17 Registers Definition for BANK=0 (default)
#define IODIRA 0x00
#define IODIRB 0x01
#define IOCONA 0x0A
#define GPPUA  0x0C
#define GPPUB  0x0D
#define GPIOA  0x12
#define GPIOB  0x13
static rom unsigned char led_patern[32] = {0b00000001,0b00000011,0b00000110,0b00001100,0b00011001,  	 			                          0b00110011,0b01100110,0b11001100,0b10011000,0b00110000,				                    0b01100000,0b11000000,0b10000000,0b00000000,0b00000000,				                    0b00000000,0b10000000,0b11000000,0b01100000,0b00110000,				                    0b10011000,0b11001100,0b01100110,0b00110011,0b00011001,				                    0b00001100,0b00000110,0b00000011,0b00000001,0b00000000,
0b00000000,0b00000000};
// Delay in 1 ms (approximately) for 16 MHz Internal Clock
void delay_ms(unsigned int ms)
{
  do {
    Delay1KTCYx(4);
  } while(--ms);
}
void SPI_Write(unsigned char addr,unsigned char data)
{
  // Activate the SS SPI Select pin
  PORTCbits.RC6 = 0;
  // Start MCP23S17 OpCode transmission
  SSPBUF = SPI_SLAVE_ID | ((SPI_SLAVE_ADDR << 1) & 0x0E)| SPI_SLAVE_WRITE;
  // Wait for Data Transmit/Receipt complete
  while(!SSPSTATbits.BF);
  // Start MCP23S17 Register Address transmission
  SSPBUF = addr;
  // Wait for Data Transmit/Receipt complete
  while(!SSPSTATbits.BF);

  // Start Data transmission
  SSPBUF = data;
  // Wait for Data Transmit/Receipt complete
  while(!SSPSTATbits.BF);
  // CS pin is not active
  PORTCbits.RC6 = 1;
}
unsigned char SPI_Read(unsigned char addr)
{
  // Activate the SS SPI Select pin
  PORTCbits.RC6 = 0;
  // Start MCP23S17 OpCode transmission
  SSPBUF = SPI_SLAVE_ID | ((SPI_SLAVE_ADDR << 1) & 0x0E)| SPI_SLAVE_READ;
  // Wait for Data Transmit/Receipt complete
  while(!SSPSTATbits.BF);
  // Start MCP23S17 Address transmission
  SSPBUF = addr;
  // Wait for Data Transmit/Receipt complete
  while(!SSPSTATbits.BF);

  // Send Dummy transmission for reading the data
  SSPBUF = 0x00;
  // Wait for Data Transmit/Receipt complete
  while(!SSPSTATbits.BF);

  // CS pin is not active
  PORTCbits.RC6 = 1;
  return(SSPBUF);
}
void main(void)
{
  unsigned char cnt,togbutton,inp;
  unsigned int idelay;

  OSCCON=0x70;         // Select 16 MHz internal clock
  TRISC = 0x00;        // Set All on PORTC as Output
  TRISA = 0x30;        // Input for RA4 and RA5
  TRISB = 0x00;
  ANSEL = 0x08;        // Set PORT AN3 to analog input
  ANSELH = 0x00;       // Set PORT AN8 to AN11 as Digital I/O
  /* Init the PIC18F14K22 ADC Peripheral */
  ADCON0=0b00001101;   // ADC port channel 3 (AN3), Enable ADC
  ADCON1=0b00000000;   // Use Internal Voltage Reference (Vdd and Vss)
  ADCON2=0b10101011;   // Right justify result, 12 TAD, Select the FRC for 16 MHz
  /* Initial the PIC18F14K22 SPI Peripheral */
  TRISCbits.TRISC6 = 0;  // RC6/SS - Output (Chip Select)
  TRISCbits.TRISC7= 0;   // RC7/SDO - Output (Serial Data Out)
  TRISBbits.TRISB4= 1;   // RB4/SDI - Input (Serial Data In)
  TRISBbits.TRISB6= 0;   // RB6/SCK - Output (Clock)

  SSPSTAT = 0x40;        // Set SMP=0 and CKE=1. Notes: The lower 6 bit is read only
  SSPCON1 = 0x20;        // Enable SPI Master with Fosc/4
  PORTCbits.RC6 = 1;     // Disable Chip Select
  // Initial the MCP23S17 SPI I/O Expander
  SPI_Write(IOCONA,0x28);   // I/O Control Register: BANK=0, SEQOP=1, HAEN=1 (Enable Addressing)
  SPI_Write(IODIRA,0x00);   // GPIOA As Output
  SPI_Write(IODIRB,0xFF);   // GPIOB As Input
  SPI_Write(GPPUB,0xFF);    // Enable Pull-up Resistor on GPIOB
  SPI_Write(GPIOA,0x00);    // Reset Output on GPIOA
  // Initial Variable Used
  togbutton=0;              // Toggle Button
  cnt=0;
  idelay=100;               // Default Delay;

  for(;;) {
    inp=SPI_Read(GPIOB);    // Read from GPIOB
	if (inp == 0xFE) {      // Button is pressed
	  delay_ms(1);

	  inp=SPI_Read(GPIOB);  // Read from GPIOB, for simple debounce
	  if (inp == 0xFE) togbutton^=0x01;
	  if (togbutton == 0x00) {
	    SPI_Write(GPIOA,0x00); // Write to MCP23S17 GPIOA
	    cnt=0;
      }
	}
    if (togbutton) {
      ADCON0bits.GO=1;
      while (ADCON0bits.GO);   // Wait conversion done
      idelay=ADRESL;           // Get the 8 bit LSB result
      idelay += (ADRESH << 8); // Get the 2 bit MSB result

      // Write to GPIOA
      SPI_Write(GPIOA,led_patern[cnt++]);
      if(cnt >= 32) cnt=0;
    }
    delay_ms(idelay);          // Call Delay function
  }
}
/* EOF: picspi.c */
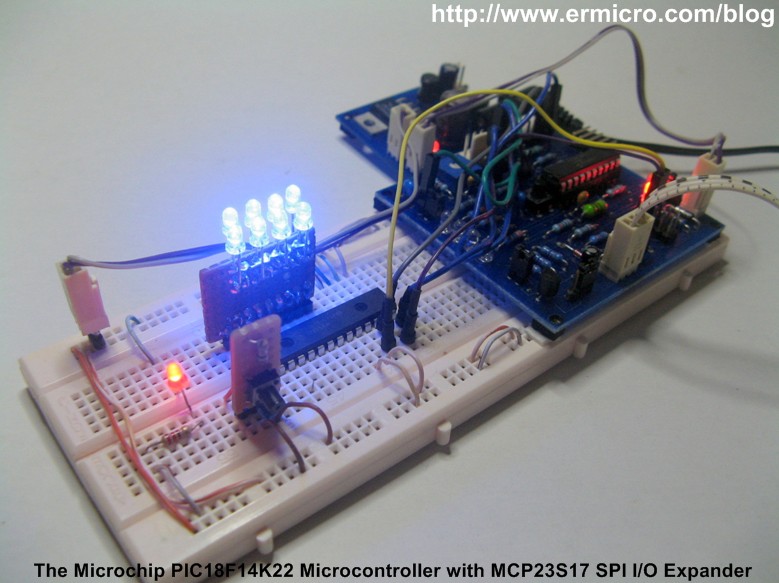
For quick prototyping this project on the breadboard I used the SIL LED display and SIL push button modules which you could read more about it in my previous posted blog Single In Line (SIL) LED Display for your Microcontroller Project.
The PIC18 SPI Peripheral
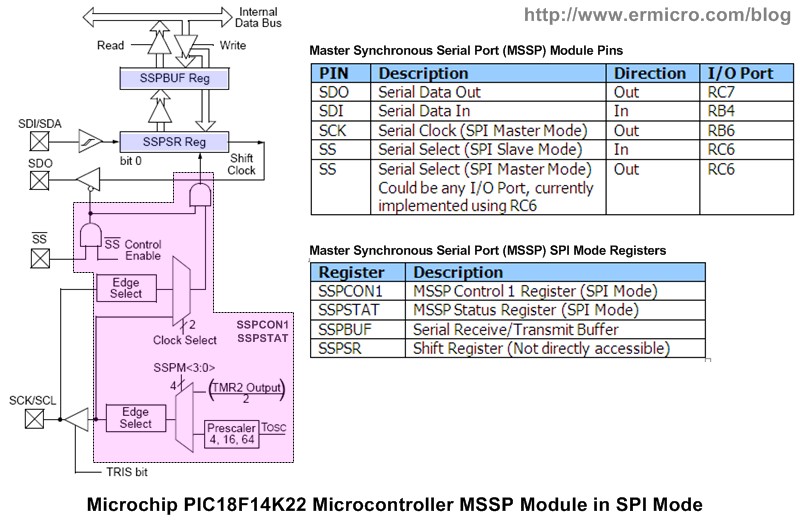
The Microchip PIC18F14K22 microcontroller SPI peripheral actually is the part of Master Synchronous Serial Port (MSSP) modules inside the PIC18F14K22 microcontroller. Each module could be operated in one of the two modes: Serial Peripheral Interface (SPI) or Inter-Integrated Circuit (I2C). The SPI module could support both SPI master and SPI slave modes. For the purpose of this tutorial we will only focusing on the SPI Master mode.
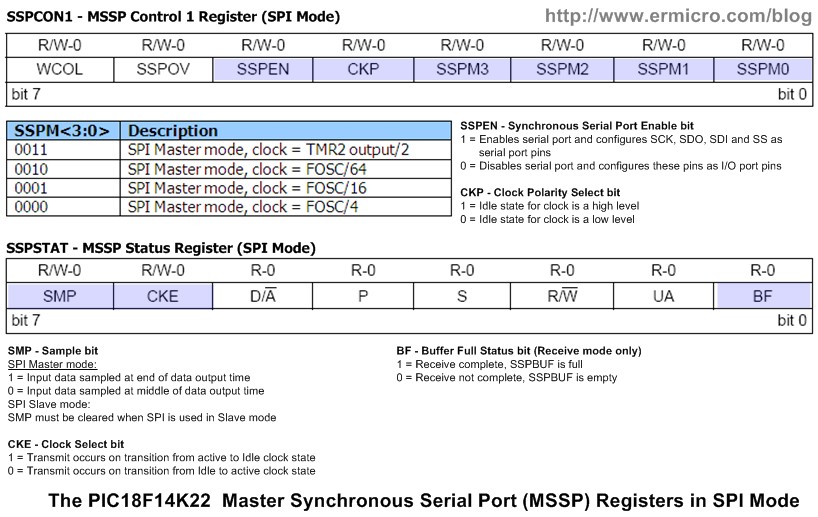
To initialize the SPI peripheral inside the PIC18F14K22 microcontroller we need to enable this device for SPI master and set the master clock frequency using the MSSP control register 1 (SSPCON1) and the SPI status register (SSPSTAT), for complete information please refer to the Microchip PIC18F14K22 microcontroller datasheet.
The first thing before we could use the PIC18F14K22 SPI peripheral is to properly configure the PIC18F14K22 tri-state registers for the SPI master I/O operation; SDO (RC7) and SCK (RB6) as output port and SDI (RB4) as the input port, while the SS can be any port for SPI master operation but on this tutorial we will use the RC6 to select the SPI slave device. The following C code is used to set these SPI ports.
/* Initial the PIC18F14K22 SPI Peripheral */
TRISCbits.TRISC6 = 0;  // RC6/SS - Output (Chip Select)
TRISCbits.TRISC7= 0;   // RC7/SDO - Output (Serial Data Out)
TRISBbits.TRISB4= 1;   // RB4/SDI - Input (Serial Data In)
TRISBbits.TRISB6= 0;   // RB6/SCK - Output (Clock)
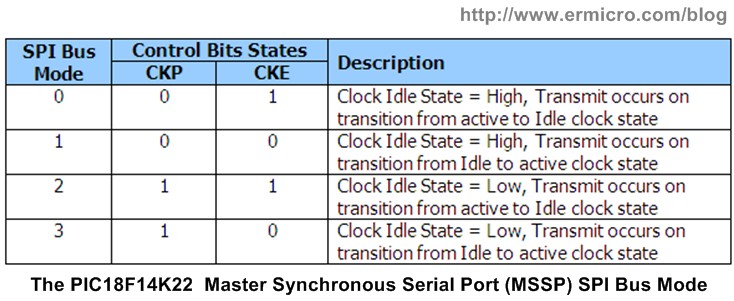
After initializing the I/O ports next we have to enable the PIC18F14K22 MSSP peripheral by setting the SSPEN (Synchronous Serial Port Enable) bit to logical “1” and selecting the SPI master clock frequency by setting the SSPM<3:0> (Synchronous Serial Port Mode) bits to maximum Fosc/4 (4 MHz) in the SSPCON1 register. The way the SPI data being transmitted or received is controlled by CKP (Clock Polarity) bit in the SSPCON1 register and CKE (Clock Select) bit in the SSPSTAT register. This behavior in the SPI world is known as the SPI bus mode, there are 4 SPI bus modes supported by the PIC18F14K22 MSSP module.
The following is the complete C code for initializing the PIC18F14K22 MSSP SPI mode:
SSPSTAT = 0x40;        // Set SMP=0 and CKE=1. Notes: The lower 6 bit is read only
SSPCON1 = 0x20;        // Enable SPI Master with Fosc/4
PORTCbits.RC6 = 1;     // Disable Chip Select
Last is the SMP bit in the SSPSTAT register, this bit is used to control how we sample the input data. Setting this bit to logical “0” means we sample the incoming data at the middle of data output time while setting this bit to logical “1” means we sample the incoming data at the end of data output time. The most commonly SPI bus mode widely supported by many SPI slave chip are mode 0 and mode 3, the different between these two mode only on the clock polarity.
Transmitting and Receiving SPI data is done in the SSPBUF register, therefore by placing the SPI master data on this register make the MSSP module start the SPI master transmission. After eight clock cycle then the 8-bit data in this register will be shifted out through the SDO pin to the SPI slave device and at the same time receive the 8-bit SPI slave data through the SDI pin. We could check this receive status by polling the BF (Buffer Full) status bit in the SSPSTAT register as shown on this following C code:
// Activate the SS SPI Select pin
PORTCbits.RC6 = 0;
// Start Data transmission
SSPBUF = TX_Data;
// Wait for Data Transmit/Receipt complete
while(!SSPSTATbits.BF);
// Get Slave Data
RX_Data = SSPBUF;
// CS pin is not active
PORTCbits.RC6 = 1;
Before we start the SPI master transmission to the SPI slave device, make sure we have to activate the SPI slave chip select pin and deactivate it after we finish transmitting the data. The complete SPI write and read algorithm is implemented in the SPI_Write() and SPI_Read() functions.
Inside The Infinite Loop
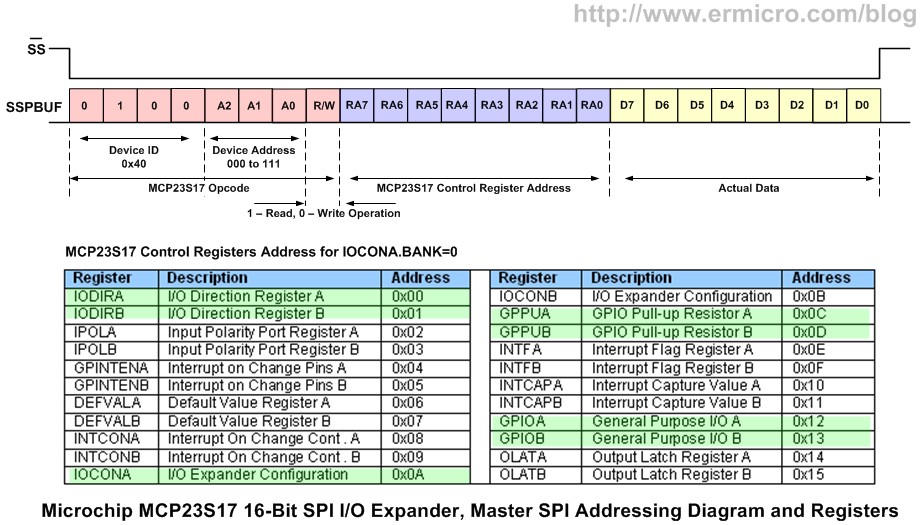
To write and read data from and to the MCP23S17 SPI I/O expander device, first we need to send a read or write operation code followed by the MCP23S17 register address then last is the SPI master data. The first 8-bit operation code data consists of the MCP23S17 device ID (0x40), address (0 to 7), and read or write operation command (1 or 0).
From the addressing diagram above you could see that at least we need to perform three SPI master writing to send or read the data to or from the MCP23S17 SPI slave I/O expander.
After configure the MCP23S17 registers, we entering the infinite loop where we simply read the MCP23S17 GPIOB input port and if the switch is pressed then the SPI master will start sending the LED display patterns to the MCP23S17 GPIOA output port.
// Initial the MCP23S17 SPI I/O Expander
SPI_Write(IOCONA,0x28);   // I/O Control Register: BANK=0, SEQOP=1, HAEN=1 (Enable Addressing)
SPI_Write(IODIRA,0x00);   // GPIOA As Output
SPI_Write(IODIRB,0xFF);   // GPIOB As Input
SPI_Write(GPPUB,0xFF);    // Enable Pull-up Resistor on GPIOB
SPI_Write(GPIOA,0x00);    // Reset Output on GPIOA
...
for(;;) {
  ...
  inp=SPI_Read(GPIOB);    // Read from GPIOB
  ...
  // Write to GPIOA
SPI_Write(GPIOA,led_patern[cnt++]);
...
}
The LED display delay is controlled by the user’s trimport on the PICJazz 20-PIN board which connected to the ADC channel 3 (AN3), for further information about using the PIC18F14K22 microcontroller ADC peripheral please refer to my previous posted blog PIC18 Microcontroller Analog to Digital Converter with Microchip C18 Compiler.
The SPI to UART Gateway
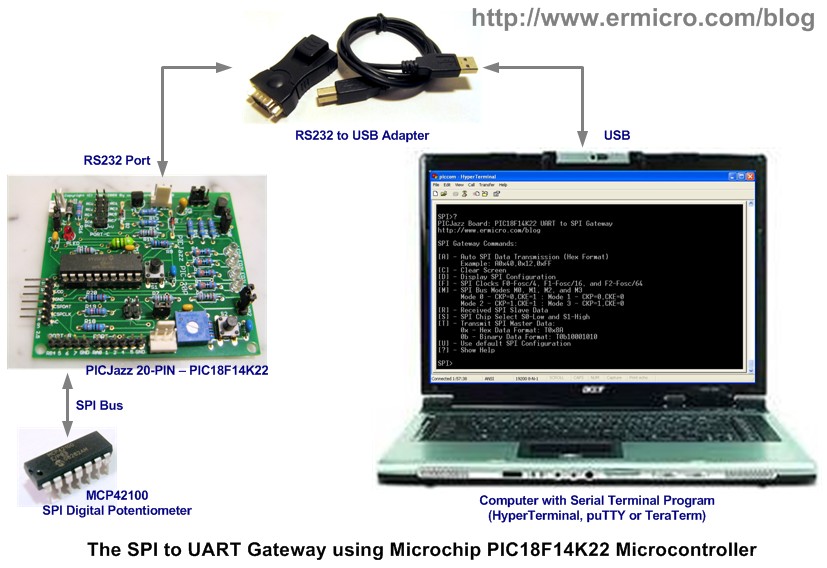
As I promised on this last tutorial we are going to turn the Microchip PIC18F14K22 microcontroller into a useful SPI slave chip testing device that could be used to test and debug almost every SPI slave chips in simple and easy way. The device is called the SPI to UART gateway as it take advantage of the PIC18F14K22 UART peripheral connected to the computer RS232/COM port (through the PICJazz 20-PIN RS232 voltage level shifter) to talk interactively with the SPI slave device.
Basically the SPI to UART gateway is the embedded system application that allows us to send the command through the computer/PC serial terminal program such as HyperTerminal, puTTY, and TeraTerm to the SPI slave device (baud rate: 19200, data bits: 8, parity: none, stop bits: 1 and emulation: ANSI).
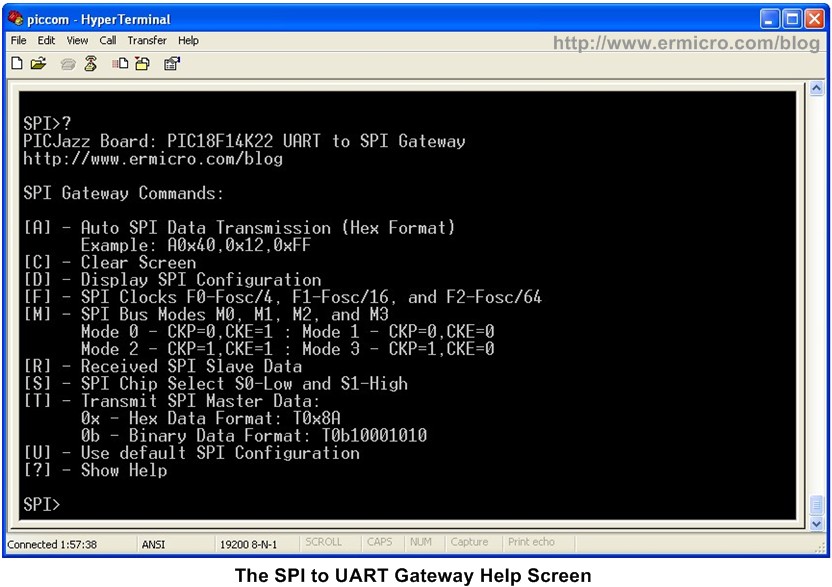
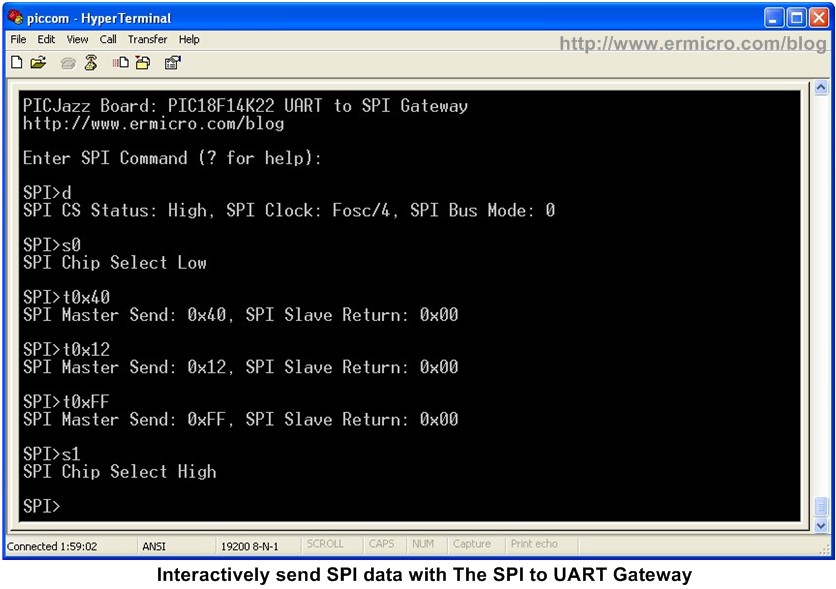
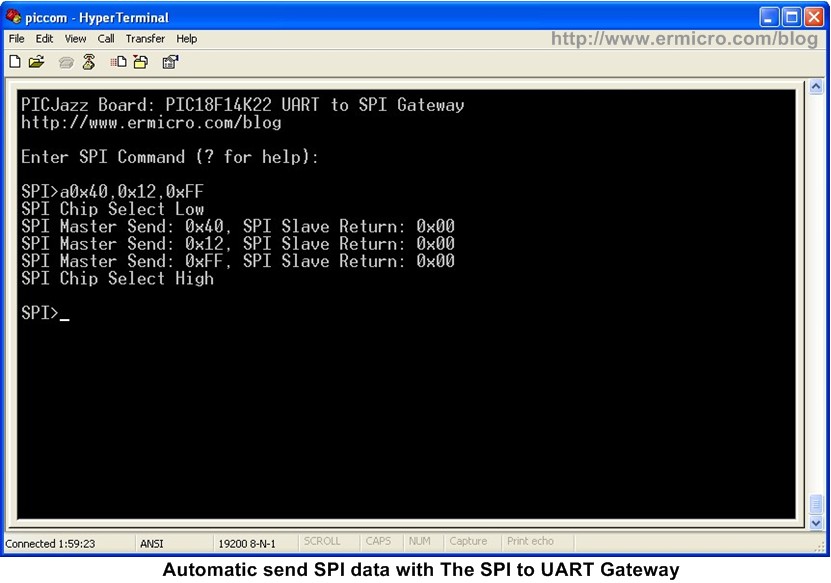
With the configurable SPI master setup such as the SPI master bus mode and SPI master clock frequency make this SPI to UART gateway application is a useful embedded system tool for testing and debugging any SPI slave device since we don’t have to make a separate program for each SPI slave device anymore. The following pictures show how to use this SPI to UART gateway application:
Beside as a useful embedded system tool, the SPI to UART gateway application also provide a good learning tool for data exchange between computer and the Microchip PIC18F14K22 microcontroller. The basic principal of the data communication presented here is used in many modern embedded system applications such as data logger, boot-loader, modem, etc. The following is the SPI to UART gateway complete C program code:
/* ***************************************************************************
**  File Name    : uart2spi.c
**  Version      : 1.0
**  Description  : UART to SPI Gateway
**  Author       : RWB
**  Target       : PICJazz 20PIN Board: PIC18F14K22
**  Compiler     : Microchip C18 v3.36 C Compiler
**  IDE          : Microchip MPLAB IDE v8.46
**  Programmer   : PICKit3, Firmware Suite Version 01.25.20
**  Last Updated : 25 Aug 2010
** ***************************************************************************/
#include <p18cxxx.h>
#include <delays.h>
#include <string.h>
/*
** PIC18F14K22 Configuration Bit:
**
** FOSC = IRC        - Internal RC Oscillator
** PLLEN = OFF       - PLL is under software control
** PCLKEN = ON       - Primary Clock Enable
** FCMEN = OFF       - Fail-Safe Clock Monitor disabled
** PWRTEN = OFF      - Power Up Timer disabled
** BOREN = OFF       - Brown-out Reset disabled in hardware and software
** WDTEN = OFF       - WDT is controlled by SWDTEN bit of the WDTCON register
** MCLRE = ON        - MCLR pin enabled, RE3 input pin disabled
** LVP = OFF         - Single-Supply ICSP disabled
*/
#pragma config FOSC = IRC, PLLEN = OFF, PCLKEN = ON
#pragma config FCMEN = OFF, BOREN = OFF, PWRTEN = OFF
#pragma config WDTEN = OFF, MCLRE = ON, LVP = OFF
// Using Internal Clock of 16 Mhz
#define FOSC 16000000L
#define BAUD_RATE 19200
#define MAX_CMD 20
rom char prompt[] = "\nSPI>";
rom char errcmd[] = "\nUnknown Command!\n";
char sdigit[3]={'0','0','\0'};
unsigned char hexval[5];
unsigned char spi_cs, spi_freq, spi_bus;
// SPI Gateway Help Screen
#define MAX_HELP 60
// .........|.........|.........|.........|.........|.........|
// 123456789012345678901234567890123456789012345678901234567890
// ........10........20........30........40........50........60
rom char helpscr[][MAX_HELP]=
 {"PICJazz Board: PIC18F14K22 UART to SPI Gateway\n",
  "http://www.ermicro.com/blog\n",
  "\nSPI Gateway Commands:\n\n",
  "[A] - Auto SPI Data Transmission (Hex Format)\n",
  "      Example: A0x40,0x12,0xFF\n",
  "[C] - Clear Screen\n",
  "[D] - Display SPI Configuration\n",
  "[F] - SPI Clocks F0-Fosc/4, F1-Fosc/16, and F2-Fosc/64\n",
  "[M] - SPI Bus Modes M0, M1, M2, and M3\n",
  "      Mode 0 - CKP=0,CKE=1 : Mode 1 - CKP=0,CKE=0\n",
  "      Mode 2 - CKP=1,CKE=1 : Mode 3 - CKP=1,CKE=0\n",
  "[R] - Received SPI Slave Data\n",
  "[S] - SPI Chip Select S0-Low and S1-High\n",
  "[T] - Transmit SPI Master Data:\n",
  "      0x - Hex Data Format: T0x8A\n",
  "      0b - Binary Data Format: T0b10001010\n",
  "[U] - Use default SPI Configuration\n",
  "[?] - Show Help\n"};
// Delay in 1 ms (approximately) for 16 MHz Internal Clock
void delay_ms(unsigned int ms)
{
  do {
    Delay1KTCYx(4);
  } while(--ms);
}
void uart_init(void)
{
  TRISBbits.TRISB5 = 1; // Set Port B5 for UART RX
  TRISBbits.TRISB7 = 0; // Set Port B7 for UART RX
  // Baud Rate formula for SYNC=0 (Async), BRG16=0 (8-bit), BRGH=0 (low speed)
  // 0.16% Error for 16 MHz Oscillator Clock. Actual baud rate will be 19230.
  // BAUD_RATE = FOSC / (64 x (SPBRG + 1))

  SPBRG = (int)(FOSC/(64UL * BAUD_RATE)) - 1;
  TXSTA = 0b00100000;  // Async, 8 bit and Enable Transmit (TXEN=1)
  RCSTA = 0b10010000;  // Serial Port Enable, Async,8-bit and Enable Receipt (CREN=1)
  BAUDCON=0x00;
}
int _user_putc(char ch)
{
  if (ch == '\n')
    _user_putc('\r');
  // Send Data when TXIF bit is clear
  while(!PIR1bits.TXIF) continue;
  TXREG = ch;
}
char _user_getc(void)
{
  // Get Data when RCIF bit is clear
  while(!PIR1bits.RCIF) continue;
  return RCREG;
}
void uart_gets(char *buf, unsigned char len)
{
  unsigned char cnt;
  cnt=0;
  while(cnt < len) {
    *buf = _user_getc();  // Get a character from the USART
    _user_putc(*buf);     // Echo Back
    cnt++;
    if (*buf == '\r') {   // Check for CR
      *buf='\0';          // Replace it with Null Terminate String
      break;
    }
    if (*buf == '\b') {   // Check for Backspace
      _user_putc(32);
      _user_putc('\b');
      buf--;buf--;
      cnt--;
    }
    buf++;
  }
  *buf='\0';              // Null Terminate String
  _user_putc('\n');
}
void uart_puts_P(rom char *buf)
{
  while(*buf) {
    _user_putc(*buf);
    buf++;
  }
}
void uart_puts(char *buf)
{
  while(*buf) {
    _user_putc(*buf);
    buf++;
  }
}
void ansi_cl(void)
{
  // ANSI clear screen: cl=\E[H\E[J
  _user_putc(27);
  _user_putc('[');
  _user_putc('H');
  _user_putc(27);
  _user_putc('[');
  _user_putc('J');
}
void ansi_me(void)
{
  // ANSI turn off all attribute: me=\E[0m
  _user_putc(27);
  _user_putc('[');
  _user_putc('0');
  _user_putc('m');
}
void disp_help(void)
{
  unsigned char i;

  // Display the Help Screen
  for(i=0;i < (sizeof(helpscr)/MAX_HELP);i++) {
    uart_puts_P(helpscr[i]);
  }
}
void spi_init(void)
{
  /* Initial the PIC18F14K22 SPI Peripheral */
  TRISCbits.TRISC6 = 0;  // RC6/SS - Output (Chip Select)
  TRISCbits.TRISC7= 0;   // RC7/SDO - Output (Serial Data Out)
  TRISBbits.TRISB4= 1;   // RB4/SDI - Input (Serial Data In)
  TRISBbits.TRISB6= 0;   // RB6/SCK - Output (Clock)

  SSPSTAT = 0x40;        // Set SMP=0 and CKE=1. Notes: The lower 6 bit is read only
  SSPCON1 = 0x20;        // Enable SPI Master, CKP=0 and Fosc/4
  PORTCbits.RC6 = 1;     // Disable Chip Select
  // Initial SPI Setup Status Variables
  spi_cs=1;
  spi_freq=0;
  spi_bus=0;
}
void spi_mode(unsigned char cmd)
{
  switch(cmd) {
    case '0':  // Mode 0
      spi_bus=0;
      SSPSTATbits.CKE=1;
      SSPCON1bits.CKP=0;
      uart_puts_P((rom char *)"SPI Mode 0\n");
      break;
    case '1':  // Mode 1
      spi_bus=1;
      SSPSTATbits.CKE=0;
      SSPCON1bits.CKP=0;
      uart_puts_P((rom char *)"SPI Mode 1\n");
      break;
    case '2':  // Mode 2
      spi_bus=2;
      SSPSTATbits.CKE=1;
      SSPCON1bits.CKP=1;
      uart_puts_P((rom char *)"SPI Mode 2\n");
      break;
    case '3':  // Mode 3
      spi_bus=3;
      SSPSTATbits.CKE=0;
      SSPCON1bits.CKP=1;
      uart_puts_P((rom char *)"SPI Mode 3\n");
      break;
    default:
      uart_puts_P(errcmd);
  }
}
void spi_slavecs(unsigned char cmd)
{
  switch(cmd) {
    case '0':  // SPI Slave Select Low
      spi_cs=0;
      PORTCbits.RC6 = 0;    // Low
      uart_puts_P((rom char *)"SPI Chip Select Low\n");
      break;
    case '1':  // SPI Slave Select High
      spi_cs=1;
      PORTCbits.RC6 = 1;    // High
      uart_puts_P((rom char *)"SPI Chip Select High\n");
      break;
    default:
      uart_puts_P(errcmd);
  }
}
void spi_clock(unsigned char cmd)
{
  switch(cmd) {
    case '0':  // SPI Clock Fosc/4
      spi_freq=0;
      SSPCON1 &= 0xF0;
      uart_puts_P((rom char *)"SPI Clock Fosc/4\n");
      break;
    case '1':  // SPI Clock Fosc/16
      spi_freq=1;
      SSPCON1 &= 0xF1;
      uart_puts_P((rom char *)"SPI Clock Fosc/16\n");
      break;
    case '2':  // SPI Clock Fosc/64
      spi_freq=2;
      SSPCON1 &= 0xF2;
      uart_puts_P((rom char *)"SPI Clock Fosc/64\n");
      break;
    default:
      uart_puts_P(errcmd);
  }
}
// Implementing integer value from 0 to 255
char *num2hex(unsigned char num)
{
   unsigned char idx;
   char hexval[]={"0123456789ABCDEF"};

   idx = 0;                     // Start with index 0
   while(num >= 16){            // Keep Looping for larger than 16
     idx++;                     // Increase index
     num -= 16;                 // Subtract number with 16
   }

   sdigit[0]='0';               // Default first Digit to '0'
   if (idx > 0)
     sdigit[0]=hexval[idx];     // Put the First digit
   sdigit[1]=hexval[num];       // Put the Second Digit
   return sdigit;
}
int hex2num(char *cmd)
{
   unsigned char num;
   if (strlen(cmd) != 2)  // 8-bit Data
     return -1;
   // Start from MSB to LSB
   num=0;
   while(*cmd) {
     num = num << 4;
     if (*cmd >= 'A' && *cmd <= 'F') {
       num += *cmd - 55;
	 } else if (*cmd >= 'a' && *cmd <= 'f') {
       num += *cmd - 87;
     } else if (*cmd >= '0' && *cmd <= '9') {
       num += *cmd - 48;
     } else {
       return -1;
     }
	 cmd++;
   }
   return num;
}
int bin2num(char *cmd)
{
  unsigned char num,cnt;
  unsigned char binval[]={128,64,32,16,8,4,2,1};

  if (strlen(cmd) != 8 ) // 8-bit Data
    return -1;

  // Start from MSB to LSB
  num=0;
  for(cnt=0;cnt<8;cnt++) {
    if (cmd[cnt] >= '0' && cmd[cnt] <= '1') {
      num += binval[cnt] * (cmd[cnt] - 48);
	} else
	  return -1;
  }
  return num;
}
unsigned char SPI_WriteRead(unsigned char data)
{
  unsigned char slave_data;
  // Send the SPI Master data
  uart_puts_P((rom char *)"SPI Master Send: 0x");
  uart_puts(num2hex(data));
  SSPBUF = data;
  // Wait for Data Transmit/Receipt complete
  while(!SSPSTATbits.BF);

  // Return SPI Slave Data
  slave_data=SSPBUF;
  uart_puts_P((rom char *)", SPI Slave Return: 0x");
  uart_puts(num2hex(slave_data)); _user_putc('\n');
  return(slave_data);
}
void spi_transmit(char *cmd)
{
  unsigned char data;
  if (*cmd != '0') {
    uart_puts_P(errcmd);
    return;
  }
  cmd++;         // Skip to the next token

  switch(*cmd) {
    case 'x':    // Hex Data
    case 'X':    // Hex Data
      data=hex2num(cmd + 1);
      if (data >= 0)
        data=SPI_WriteRead((unsigned char) data);
      else
       uart_puts_P(errcmd);
      break;
    case 'b':    // Binary Data
    case 'B':    // Binary Data
      data=bin2num(cmd + 1);
      if (data >= 0)
        data=SPI_WriteRead((unsigned char) data);
      else
        uart_puts_P(errcmd);
      break;
    default:
      uart_puts_P(errcmd);
  }
}
void auto_transmit(char *cmd)
{
  unsigned char cnt,hexcnt;

  // Set Slave CS Pin Low
  spi_slavecs('0');
  // Transmit SPI Data
  cnt=0;
  hexcnt=0;
  while(cmd[cnt]) {
    if (cmd[cnt] != ',') {       // Check for Command Separator
      hexval[hexcnt++]=cmd[cnt];
      if (hexcnt > 4) {          // Max Hex Format 0xFF (4)
	 uart_puts_P(errcmd);
	 return;
      }
    } else {
      hexval[hexcnt]='\0';	     // Null Terminated
      spi_transmit(hexval);
      hexcnt=0;
    }
    cnt++;
  }

  // Transmit the last SPI Data
  hexval[hexcnt]='\0';           // Null Terminated
  spi_transmit(hexval);
  // Set Slave CS Pin High
  spi_slavecs('1');
}
void disp_config()
{
  // Display SPI Chip Select Status
  uart_puts_P((rom char *)"SPI CS Status: ");
  switch (spi_cs) {
    case 0:
      uart_puts_P((rom char *)"Low");
      break;
    case 1:
      uart_puts_P((rom char *)"High");
      break;
    default:
      uart_puts_P(errcmd);
  }
  // Display SPI Frequency Setup
  uart_puts_P((rom char *)", SPI Clock: ");
  switch (spi_freq) {
    case 0:
      uart_puts_P((rom char *)"Fosc/4");
      break;
    case 1:
      uart_puts_P((rom char *)"Fosc/16");
      break;
    case 2:
      uart_puts_P((rom char *)"Fosc/64");
      break;
    default:
      uart_puts_P(errcmd);
  }
  // Display SPI Mode Setup
  uart_puts_P((rom char *)", SPI Bus Mode: ");
  switch (spi_bus) {
    case 0:
      _user_putc('0');
      break;
    case 1:
      _user_putc('1');
      break;
    case 2:
      _user_putc('2');
      break;
    case 3:
      _user_putc('3');
      break;
    default:
      uart_puts_P(errcmd);
  }
  _user_putc('\n');
}
void disp_header()
{
   uart_puts_P(helpscr[0]);
   uart_puts_P(helpscr[1]);
   uart_puts_P((rom char *)"\nEnter SPI Command (? for help):\n");
}
void main(void)
{
  char cmd[MAX_CMD + 1];
  unsigned char data;
OSCCON=0x70; // Select 16 MHz internal clock
  TRISC = 0x00;        // Set All on PORTC as Output
  TRISA = 0x30;        // Input for RA4 and RA5
  TRISB = 0x00;
  ANSEL = 0x00;        // Set PORT AN to analog input
  ANSELH = 0x00;       // Set PORT AN8 to AN11 as Digital I/O

  // Initial the UART
  uart_init();
  delay_ms(1);         // Make 1 ms delay here for the UART initialization
  // Initial default SPI
  spi_init();
  // Clear and Initial ANSI Terminal
  ansi_cl();
  ansi_me();
  ansi_cl();
  disp_header();

  for(;;) {
    uart_puts_P(prompt); uart_gets(cmd,MAX_CMD);
    switch (cmd[0]) {
      case 'a':       // Automatic SPI Transmit
      case 'A':       // Automatic SPI Transmit
        auto_transmit(cmd + 1);
        break;
      case 'c':       // Clear Screen
      case 'C':       // Clear Screen
        if (cmd[1] != '\0') {
          uart_puts_P(errcmd);
        } else {
          ansi_cl();
          disp_header();
        }
        break;
      case 'd':       // Display SPI Configuration
      case 'D':       // Display SPI Configuration
        if (cmd[1] != '\0') {
          uart_puts_P(errcmd);
        } else {
          disp_config();
        }
        break;
      case 'f':       // Set SPI Master Clock
      case 'F':       // Set SPI Master Clock
        spi_clock(cmd[1]);
        break;
      case 'm':       // Set SPI Bus Mode
      case 'M':       // Set SPI Bus Mode
        spi_mode(cmd[1]);
        break;
      case 'r':       // Receive SPI Slave Data
      case 'R':       // Receive SPI Slave Data
        if (cmd[1] != '\0') {
          uart_puts_P(errcmd);
        } else {
          data=SPI_WriteRead(0x00);
          uart_puts_P((rom char *)"SPI Read: 0x");
          uart_puts(num2hex(data)); _user_putc('\n');
        }
        break;
      case 's':       // SPI Slave Chip Select
      case 'S':       // SPI Slave Chip Select
        spi_slavecs(cmd[1]);
        break;
      case 't':       // Transmit SPI Master Data
      case 'T':       // Transmit SPI Master Data
        spi_transmit(cmd + 1);
        break;
      case 'u':       // Used Default Configuration
      case 'U':       // Used Default Configuration
        if (cmd[1] != '\0') {
          uart_puts_P(errcmd);
        } else {
          spi_init();
          uart_puts_P((rom char *)"Default SPI Config:\n");
          disp_config();
        }
        break;
      case '?':       // Display Help
        if (cmd[1] != '\0')
          uart_puts_P(errcmd);
        else
          disp_help();
        break;
      default:
        uart_puts_P(errcmd);
    }
  }
}
/* EOF: uart2spi.c */
Inside the SPI to UART Gateway C Code
The heart of the SPI to UART gateway application relies on the PIC18F14K22 UART and SPI peripherals. You could read more information about using the Microchip 8-bit PIC microcontroller UART on my previous blog Behavior Based Artificial Intelligent Mobile Robot with Sharp GP2D120 Distance Measuring Sensor – BRAM Part 2. The following list show all the UART functions used in this program:
- uart_init() – initialized the PIC18F14K22 UART peripheral with 19200 baud rate for transmitting and receiving data.
- _user_putc() – transmit the UART data
- _user_getc() – receive the UART data
- uart_gets() – read a string from UART and terminated with carriage return
- uart_puts_P() – retrieve a string reside on the flash RAM (program memory) and transmit it through UART
- uart_puts() – retrieve a string reside on the data SRAM (data memory) and transmit it through UART
- ansi_cl() – ANSI terminal clear screen command
- ansi_me() – ANSI terminal set attribute command
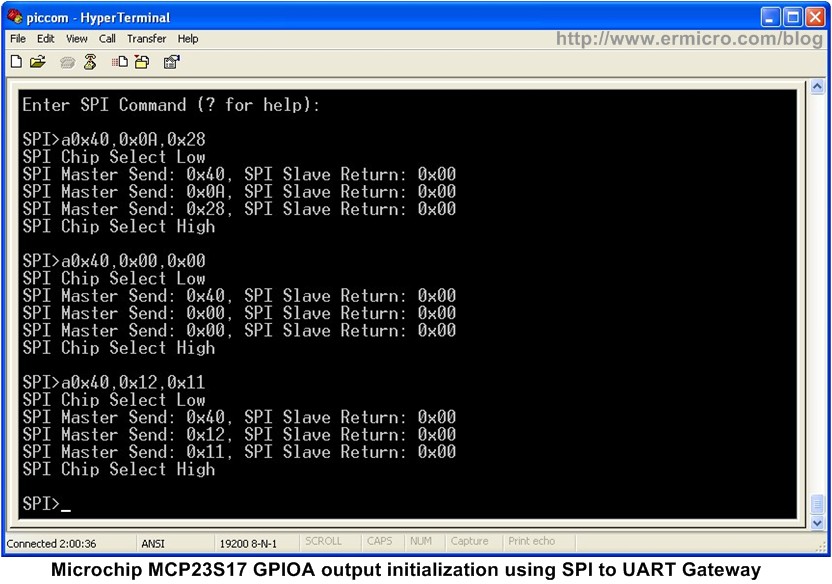
After the UART and SPI initialization, the SPI to UART gateway program enter the infinite loop where we continuously read the gateway command sent by the serial terminal program, interpret and execute it. The following picture shows how I used the SPI to UART gateway to initialize the Microchip MCP23S17 I/O expander GPIOA for output:
From the picture above using the automatic command (A), first we send three 8-bit data consecutively to set the MCP23S17 SPI I/O expander IOCONA (0x0A) with 0x28 for enabling the addressing mode. Remember that the first 8-bit contain the MCP23S17 device ID, address and write operation code (0x40). Next again we set the MCP23S17 IODIRA (0x00) to 0x00 to configure GPIOA as output and the last we send the data (0x11) to the MCP23S17 GPIOA port (0x12).
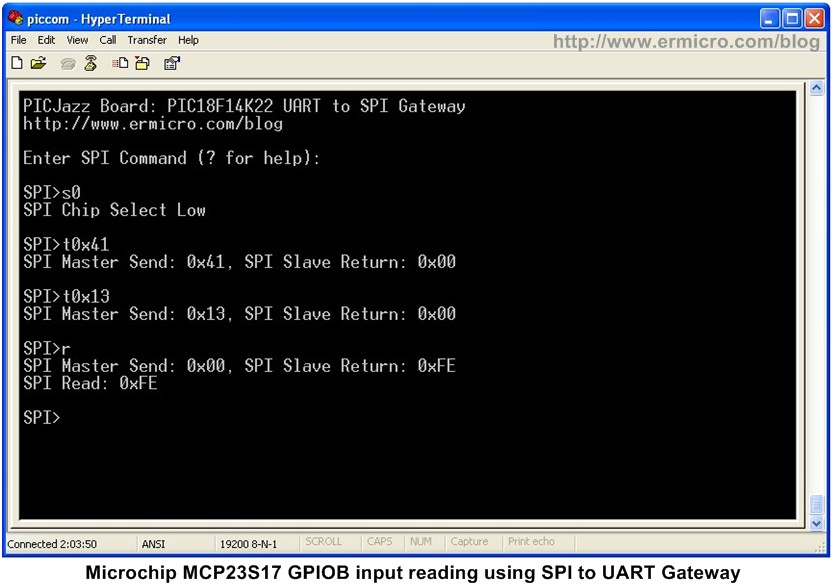
Using the same principal we could easily read the MCP23S17 GPIOB (0x13) port (remember that first we have to initialize the IODIRB before reading the GPIOB port) using the interactive transmit (T) and receive (R) commands to send and read the data.
As you noticed the first 8-bit data is 0x41 instead of 0x40, this is because we use the reading operation instead of the writing operation from the MCP23S17 GPIOB (0x13) port.
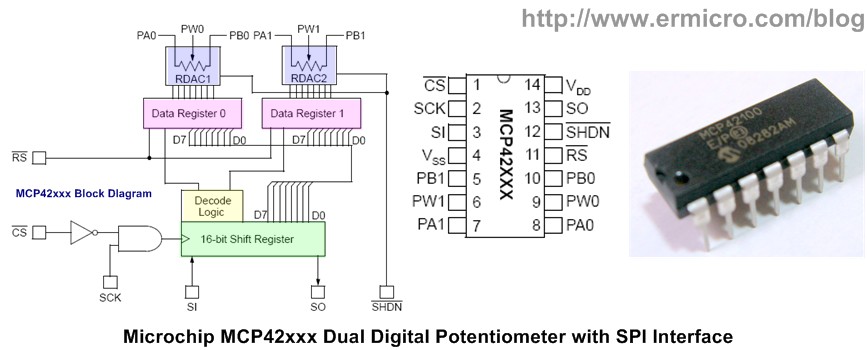
The Microchip MCP42xxx Dual Digital Potentiometer
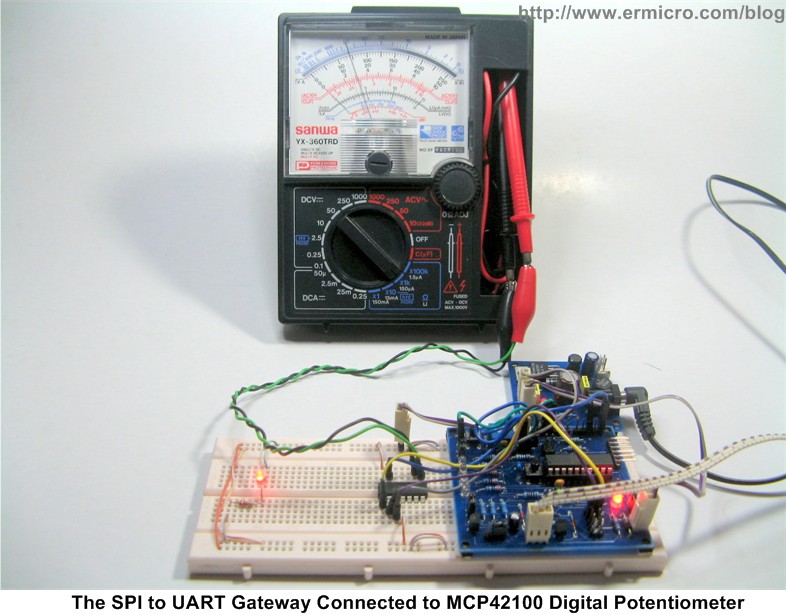
On the last example of this tutorial I will show you how to use the SPI to UART gateway application to control the Microchip MCP42100 digital potentiometer (100K).
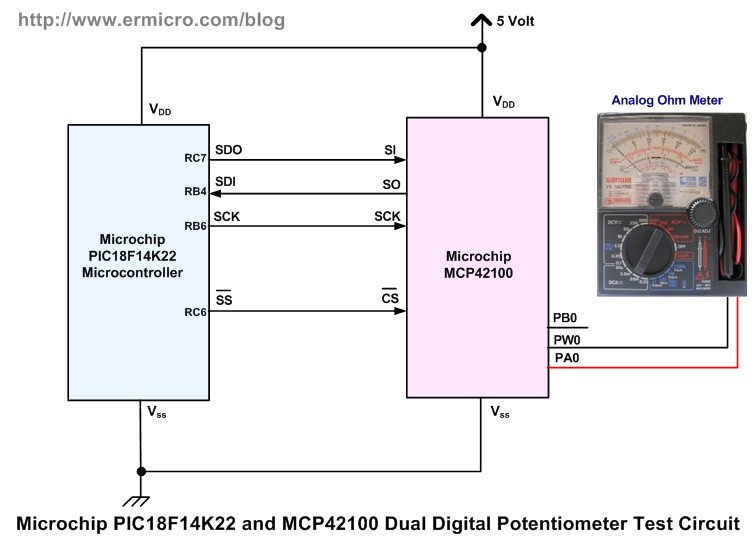
The basic connection to test the Microchip MCP42100 is shown on the schematic above; here I used the analog Ohm meter so you could watch the needle as it move.
The Microchip MCP42100 provides two100K digital potentiometer where the potentiometer wiper could be control through the SPI interface in 256 steps.
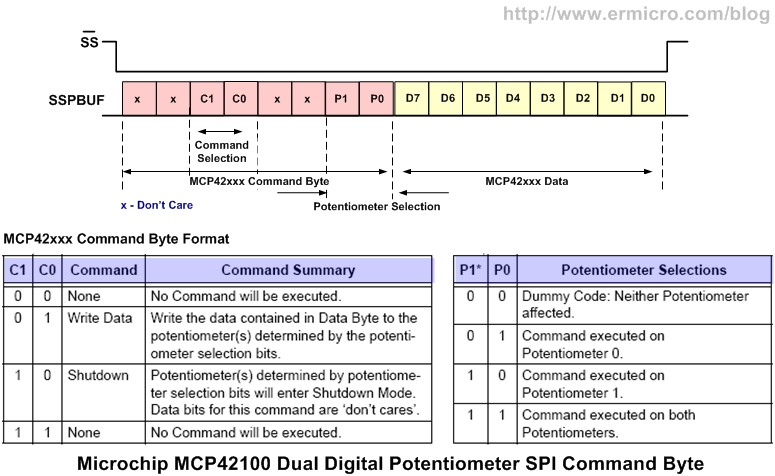
To control the MCP42100 (100K) digital potentiometer we need to send the command byte and followed by the potentiometer data register (0 to 255). The default value of the digital potentiometer data register is in the center or in our case is about 50K. Changing the potentiometer data register will vary this value from 0 to 100K in 256 steps. For example if we want to make a full 100K for both potentiometers (PWx and PAx pins) we could enter these following commands on the serial terminal program:
SPI>S0
Chip SPI Select Low
SPI>T0x13
SPI Master Send: 0x13, SPI Slave Return: 0x00
SPI>T0xFF
SPI Master Send: 0xFF, SPI Slave Return: 0x00
SPI>S1
Chip SPI Select High
The first SPI to UART gateway command is used to activate the MCP42100 SPI slave chip (S0), next we send the command byte (0x13) to write to both potentiometer data registers follow by 0xFF to set the potentiometer data register. Last we deactivate the MCP42100 SPI slave chip by issuing the S1 command. The SPI to UART gateway program is designed to accept both upper and lower case commands.
Now you could watch and enjoy the entire project presented here on this following video, where you could see how to use the SPI to UART gateway for testing both Microchip MCP23S17 SPI I/O expander and Microchip MCP42100 dual digital potentiometer.
The Final Thought
The Serial Peripheral Interface (SPI) nowadays is become a popular choice of the embedded system interface because of its simplicity and speed. On this tutorial you’ve learned to utilize the Microchip PIC18F14K22 microcontroller SPI peripheral to expand the I/O port and turn it into the SPI to UART gateway for testing and debugging the SPI slave device.
In fact one of the well known open source commercial embedded system tools application called “Bus Pirate” (http://dangerousprototypes.com) is built based on this SPI to UART gateway idea (I don’t know who first started this idea) and they add more features on it to handle various embedded system interfaces such as I2C, 1-Wire, UART, PC keyboard, MIDI (Musical Instrument Digital Interface), etc.
Hopefully what you’ve learned here could extend your knowledge to use various SPI slave device out there in your next embedded system project.
Bookmarks and Share


Related Posts
5 Responses to “Using Serial Peripheral Interface (SPI) with Microchip PIC18 Families Microcontroller”
Comment by rwb.
The SMB380 digital 3-axis accelerometer has 10-bit acceleration output resolution. For complete read the acceleration data output, you need two read cycles because the 10-bit data is split into 8-bit MSB and 2-bit LSB. The 16-bit protocol mention in datasheet is the protocol used to read/write the SMB380 accelerometer where the first 8-bit contain a read/write command (0 – writing, 1 – reading) follow by 7-bit address and the last is the 8-bit acceleration data, therefore you could use it with Microchip PIC18LF4520 microcontroller SPI peripheral.
Comment by 002.
Ok, cool. Thank you.
Like so the MCP23S17 use 24-bit protocol then?
Very nice tutorial. I manage to use spi with the mcp23s17. Will try the second part “SPI to UART Gateway” later.
Comment by massy6tu.
First I must give my compliments to the forum.
I would like to program in PLL with SPI interface “MB1501”. How do I send information from pic to pll 19-bit. I understand that I must send 8bit+8bit but how do I send the latest (3bit)? and then leads to high SS pin.
Thanks
Comment by chasxmd.
This is a really nice blog entry. I was poking around because I noticed my /CS wasn’t working as I expected and found this. I happened to be using the same PIC … and similar code.. you have:
// Start Data transmission
SSPBUF = data;
// Wait for Data Transmit/Receipt complete
while(!SSPSTATbits.BF);
// CS pin is not active
PORTCbits.RC6 = 1;
In my program my CS output (RC6 for yours) goes high before my second bit is on the way (reviewed by logic analyzer). .. in fact my main loop has made it back to the top before the byte is sent. The SSPSTAT register specification mentions .BF is only used for receive only… have you confirmed that your chip select (RC6) actually is waiting to go high until the last bit of the byte is on it’s way? Mine appears that (!SSPSTATbits.BF) is true before the byte is finished.
I’m not looking for support or help, I was just wondering if you had actually ever checked that?
Thank you..


Comment by 002.
Hello I want to use the “SMB380 digital 3-axis accelerometer” with the PIC18LF4520 microcontroller.
The datasheet for the smb380 writes: “The SPI interfaces using three wire or four wire bus provide 16-bit protocols. Multiple read out is possible.”
As I understand then it’s not compatible with the 8-bit spi interface of the PIC?